
To install a bathroom vanity, shut off the water supply, remove the old unit, level and anchor the new cabinet to the wall studs, set the countertop, connect the plumbing, and caulk every joint. Whether you are swapping an old unit for a fresh look or fitting one into a new build, the process follows the same core steps. This step by step guide to bathroom vanity installation walks you through every phase, from shutting off the water to applying the final bead of caulk. Done right, a bathroom vanity installation takes four to eight hours and can save you hundreds in labor costs.
To install a bathroom vanity, shut off the water supply, remove the old unit, mark stud locations, position and level the new cabinet, anchor it to the wall, set the countertop, connect the faucet and plumbing lines, test for leaks, and caulk all joints with mold resistant silicone.
Tools and Materials You Need Before Starting
Gather everything before you begin. Running to the hardware store mid project with the water shut off wastes time and adds stress. Here is what you need.
For tools, prepare an adjustable wrench, tongue and groove pliers, a cordless drill with Phillips bits, a hole saw for plumbing cutouts, a four foot level, a tape measure, a stud finder, a utility knife, a pry bar, a bucket, and safety glasses.
Materials include the new vanity cabinet, the countertop (if sold separately), a sink and faucet, braided stainless steel supply lines, a P trap assembly, plumber’s putty or silicone, plumber’s tape for threaded joints, mold resistant silicone caulk, composite plastic shims, three inch drywall screws, and painter’s tape.
One time saving tip stands above the rest. Install the faucet and drain assembly on the countertop before you set the vanity in place. Choosing an EPA WaterSense labeled faucet can cut your sink’s water use by up to 30 percent without sacrificing flow. Working on a flat surface gives you far better access than reaching inside a dark cabinet from below.
Shut Off the Water and Remove the Old Vanity
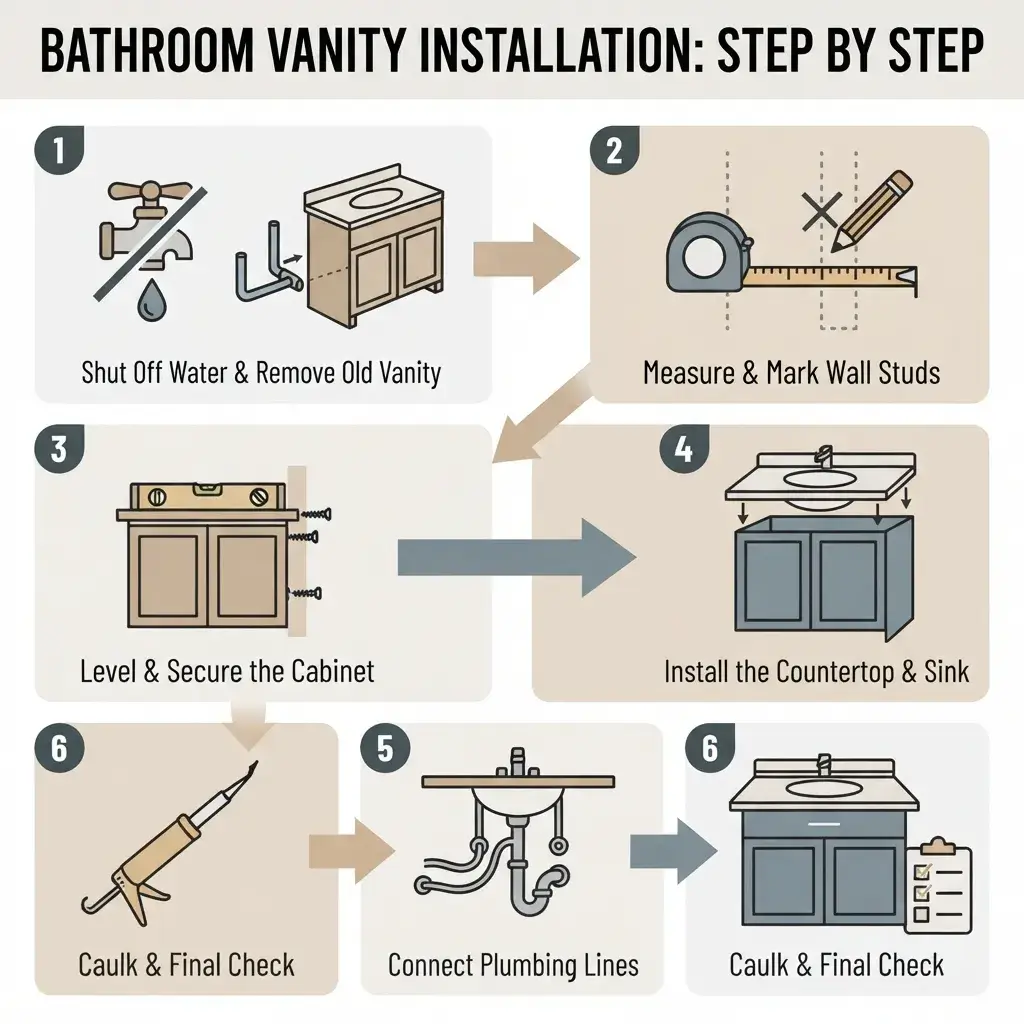
Turn both the hot and cold shutoff valves clockwise until they stop. Open the faucet to release pressure and let the remaining water drain out. Place a bucket under the P trap to catch any leftover water when you disconnect the drain.
Use an adjustable wrench to disconnect the supply lines from the shutoff valves. Loosen the slip nuts on the P trap by hand or with pliers and slide the trap free. Score the caulk lines where the vanity meets the wall using a utility knife, then remove the mounting screws from the back of the cabinet. Lift off the countertop (get a helper for heavy stone tops) and slide the cabinet out.
Scrape any leftover caulk or adhesive from the wall and floor. Completing these touch ups is a key part of any bathroom vanity installation because they become nearly impossible once the cabinet is in position.
Prepare the New Cabinet
Remove the cabinet doors and drawers to reduce weight and give yourself room to work. Use the stud finder to mark stud locations on the wall at the height where the vanity’s mounting rail will sit.
Hold the vanity in its rough position and mark on the back panel where the supply lines and drain pipe exit the wall. Pull the vanity out, then use a hole saw to cut the plumbing access holes slightly oversized, about one to two inches larger than the pipe diameter. This extra clearance lets you adjust alignment during final positioning.
Position, Level, and Anchor the Vanity to the Wall
Slide the cabinet into place over the plumbing and check it with a level in both directions, side to side and front to back. Bathroom floors are rarely perfectly flat, so slide composite plastic shims under the base until the cabinet reads level and does not rock. Composite shims hold up far better than wood in a humid bathroom because they do not compress or absorb moisture over time.
Drive three inch drywall screws through the mounting rail into the wall studs. Use at least two screws per stud location for a secure hold. Score off the excess shim material flush with the cabinet base using a utility knife.
Never skip this leveling step. An unlevel vanity causes drawers to stick, doors to swing on their own, and water to pool unevenly around the sink basin.
Install the Countertop and Sink
If the countertop is a separate piece, dry fit it first without adhesive. Confirm it sits flat and overhangs the cabinet face by about one inch on each side. Once fit looks good, apply a bead of silicone along the top edge of the cabinet, lower the countertop with a helper, and press firmly. Wipe away any squeeze out with a damp cloth right away.
For the drain, roll a rope of plumber’s putty and press it around the underside of the drain flange before inserting it. Thread the locknut from below and tighten by hand until snug. Some sink materials like granite composite require silicone instead of putty, so always check the manufacturer’s instructions.
Connect the Plumbing and Test for Leaks
Thread the braided stainless supply lines from the faucet tailpieces down to the shutoff valves. Wrap two layers of plumber’s tape around any threaded metal joints before connecting. Hand tighten, then snug one quarter turn with the wrench.
Assemble the P trap. The curved section connects the drain tailpiece to the stub out in the wall. Make sure the arm from the trap to the wall slopes slightly downward, about a quarter inch per foot, for proper drainage. Hand-tighten the slip nuts and add one quarter turn with pliers. Overtightening plastic nuts cracks them and causes slow leaks.
Now open the shutoff valves slowly, a quarter turn at a time. Watch every connection. Run the faucet for a full two minutes while checking underneath with a flashlight. Lay dry paper towels under each joint to catch any seepage that might not drip visibly. Fix any leaks now, before you move on to caulking.
Caulk and Finish the Bathroom Vanity Installation
With zero leaks confirmed, apply mold resistant silicone caulk along the backsplash joint where the countertop meets the wall and along the base where the cabinet meets the floor. Lay painter’s tape on both sides of the joint first for a clean line. Smooth the caulk with a damp finger in one steady stroke, then peel the tape at a forty five degree angle while the caulk is still wet.
Reinstall the cabinet doors and drawers. Adjust the hinges and drawer slides until everything lines up and closes flush. Add handles or knobs, wipe down the entire unit, and let the silicone cure for twenty four hours before using water near the joints. Your bathroom vanity installation is complete.
Floating Vanity Installation: What Changes
A floating or wall mounted vanity follows the same general steps but adds three requirements. First, the wall must have wall blocking, typically two-by-six or two by eight lumber, between the studs to carry the full weight of the unit. Standard drywall alone cannot support a floating vanity. If blocking does not already exist, a carpenter will need to open the wall and install it before you proceed.
Second, you get to choose the mounting height. Standard countertop height sits between thirty two and thirty six inches from the finished floor. Mark the bracket position on the wall and measure from the floor at several points since floors are rarely flat.
Third, plumbing access is tighter. Measure the drain and supply positions with extra care because a one inch misalignment on a floor standing cabinet is easy to hide, but on a floating unit with exposed plumbing it stands out.
Frequently Asked Questions
How long does it take to install a bathroom vanity?
A standard swap takes four to eight hours for a first time DIYer. Experienced hands can finish in two to four hours. The biggest time factors are the difficulty of removing the old unit and whether the countertop needs adhesive cure time.
Do I need a permit to install a bathroom vanity?
For a like for like replacement with no plumbing relocation, most areas do not require a permit. Permits typically apply when you move drain or supply lines, add a second sink, or do any electrical work in the bathroom. Check with your local building department before starting.
What kind of caulk should I use around a bathroom vanity?
Use 100 percent silicone caulk rated for bathrooms with mold and mildew resistance. Standard latex painter’s caulk shrinks and cracks in humid environments and should not be used in wet zones around a vanity or sink.
Can I install a bathroom vanity by myself?
Most of the job is manageable solo. Two steps benefit from a second person: lifting a heavy stone countertop and lowering it onto the cabinet. Everything else, including plumbing connections, leveling, and caulking, is straightforward one person work.
My floor is uneven. How do I level the vanity?
Use composite plastic shims under the low corners until a level reads true in both directions. These shims resist moisture and do not compress like wood. Once the cabinet is anchored, trim the shim ends flush with the base and hide any visible gap with caulk or base trim.